
In my previous blog I talked about the challenges two months into our bungalow renovation. At this stage things were starting to take shape, but it’s always good to stop and reflect on how far you’ve come.
If you are new to my blog and this is the first time you are reading, we purchased a 1960s bungalow and embarked on a journey to create our dream family home. You can read more about why we chose this property here
Although the 1960s bungalow needed a huge amount of work, there is definite merit in considering a bungalow plot if you are looking for a renovation project. Bungalows are always detached so usually you get a larger footprint than semi-detached and terraced houses. You usually get a front garden too and you gain a wider house which can give you lots of options for how to develop the new build.
Before I get into the real details of the bungalow renovation, I want to share the floor plans that we were working from and compare to the original bungalow layout. I think it really highlights the huge changes we’ve made to the bungalow design and how we are really working towards a home that serves our family well.
Here is the original bungalow layout:

Problems with the Original 1960’s Bungalow Layout
As you can see the original layout is quite structured and boxy. The kitchen is relatively small compared to the other rooms and there is only one bathroom and three bedrooms. For a family of five this is an issue!
If you read my first renovation blog you will know that we originally wanted a full first storey extension but had to compromise with a partial one. Depending on where you live, bungalows can get planning permission to add dormer extensions and in some cases a full first floor but our bungalow is a back land development. This provided a different set of challenges which you can read about here
The partial extension has still given us some extra space and allowed for the master bedroom and ensuite to be separate from the ground floor. This gives Matt and I a little sanctuary away from the sometimes chaotic rest of the house!
Here are the floor plans for the new layout ground floor and upper floor extension:
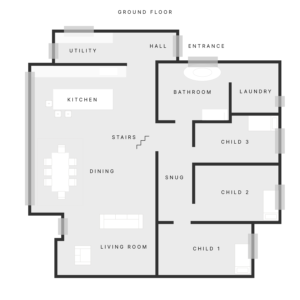

Benefits of the New Layout and Upper Floor Extension
On the ground floor you can see that we now have a much more open plan layout. The kitchen, dining and living room all flow one into the other and we have some utility space behind the kitchen to hide some of the appliances.
Another key thing that we wanted from the layout was to have great space for our three little ladies. You can see that their bedrooms are all next to each other and they also have a communal snug area yet to be designed!
We kept just three walls, one of them being from our “Child 3” bedroom which was to accommodate an oversized family bathroom which is going to become even more important as the ladies get older. I’m sure there are plenty of arguments about bathroom time coming my way!
We will be adding internal glass doors to separate the hallway from the utility room and the entrance into the snug. It is slowly coming together.

I’m so pleased with the layout of our home now, but I honestly never thought I would ever end up living in a bungalow. It’s a great property type to consider if you want to have the flexibility to design your own living space. I hope this information is useful and if a bungalow is something you are considering investing in, don’t hesitate to get in touch with any questions.
You can comment below or always find me on instagram @hygge_for_home

 No products in the cart.